Packaging your own APK file
This page will provide an advanced guide for those who have some understanding of RPG Maker, computers, and Android, to build an .apk file that can be installed directly without supporting software.
Currently, this guide only supports RPG Maker MV/MZ. Other engines may be included in the future.
Please follow the entire guide in order.
Table of Contents
- Initial Preparation
- Create a new keystore to sign the APK file
- RPG Maker MV/MZ
Initial Preparation
You will only need to do these steps the first time.
Install Java JDK
OpenJDK is recommended instead of Oracle JDK! Oracle JDK will have certain licensing restrictions and may cause your application to have trouble in the future.
Choosing a version
-
Go to the Cordova guide for Android to see the list of
cordova-androidversions. -
Choose the
cordova-androidversion you want to install. I recommend using the latest version (14.0.xas of August 1, 2025) if you don’t care about supporting lower Android versions, or version11.0.xif you want the game to support Android 5.1 as well. -
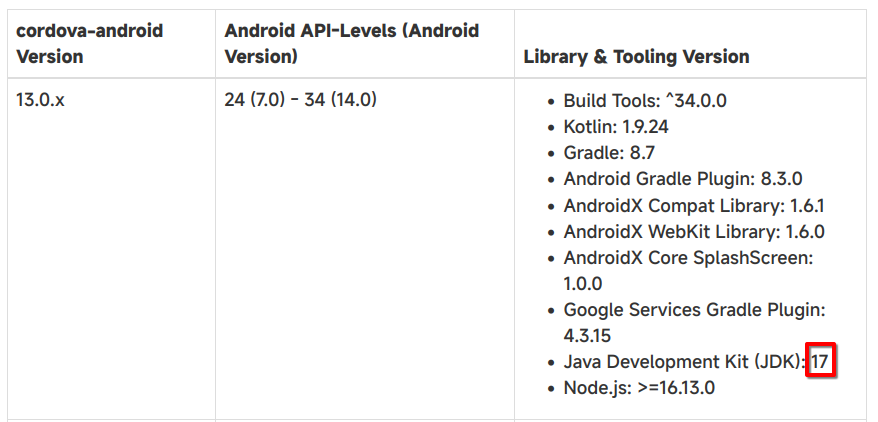
After choosing the Android version, switch to the Library & Tooling Version column. You will see the JDK version required for the
cordova-androidversion you have chosen.
Download and Install
Windows and macOS
-
Go to the OpenJDK download website.
-
Select the OpenJDK version you want to download:
- Choose the Java Version that matches the JDK version you selected in the Choosing a version section. For the latest
cordova-androidversion, we will use version 17. - Choose the Operating System that you are currently using.
- Choose the Architecture of your computer's CPU (x86 or ARM).
- Choose the Java Package as JDK.
- Choose the Java Version that matches the JDK version you selected in the Choosing a version section. For the latest
After you have made your selections, the list of versions will look like this:

-
Click on the first
.msi(or.pkgfor macOS) link in the list (in the image above, it would be version17.0.16+8). If a newer version is available in the future, you should choose that newer version. -
After downloading, double-click the downloaded
.msior.pkgfile and proceed with the installation.
Linux
Please refer to the OpenJDK installation guide specific to your distro. Each distro will have a different installation method.Install Android Studio and Android SDK
-
Go to the official Android Studio website. Click the Download button right at the top of the website, agree to the terms of use, and the website will automatically download the version for your operating system.
-
After downloading, proceed with the installation as usual.
-
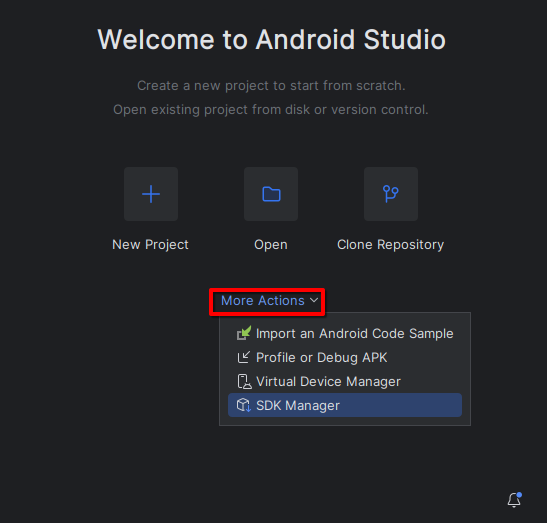
Open the Android Studio application. Click on More Actions in the middle of the window and select SDK Manager.
- In the SDK Platforms tab, select the Android SDK version according to the
cordova-androidversion you chose in the Choosing a version section. Pay attention to the Android API Levels section; for the latestcordova-androidversion, you will choose an Android SDK version from 24 (Android 7.0) to 34 (Android 14.0).
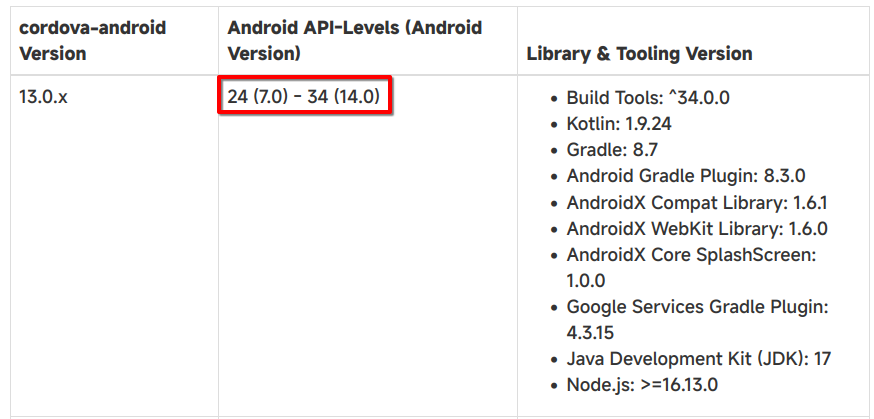
Here I will choose the highest supported Android SDK version, which is Android 14 (API Level 34).
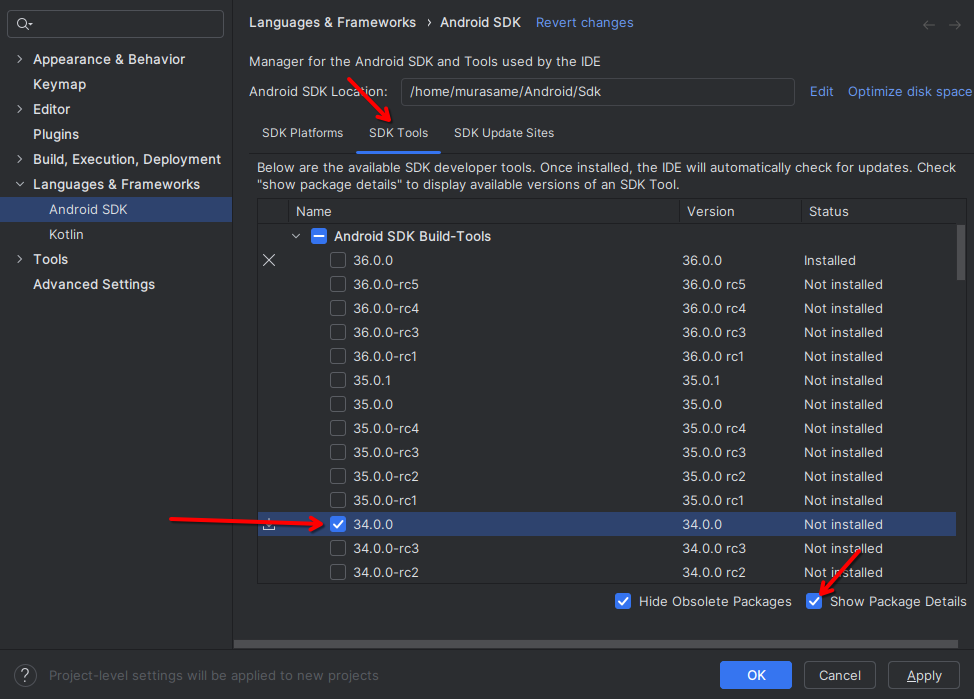
- Click on the SDK Tools tab, and select the Show Package Details option. Then, in the Android SDK Build Tools section, select the version that matches the API Level you just chose.
- In the Android Command Line Tools section, select the latest version.
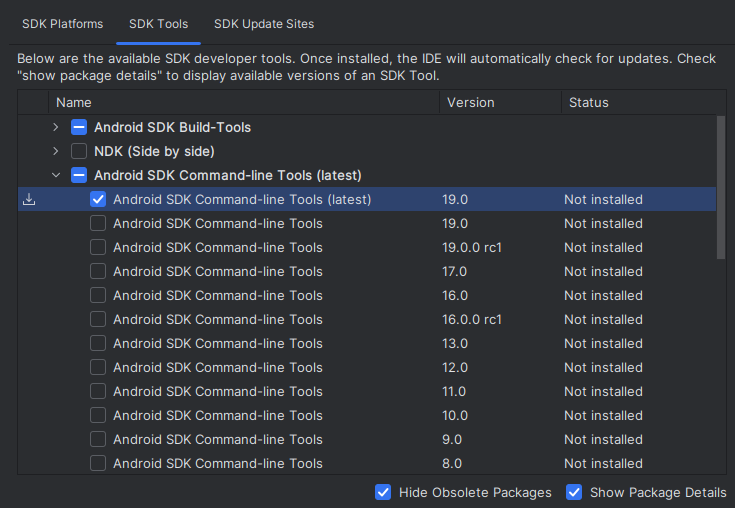
- Check the Android SDK Platform-Tools box.
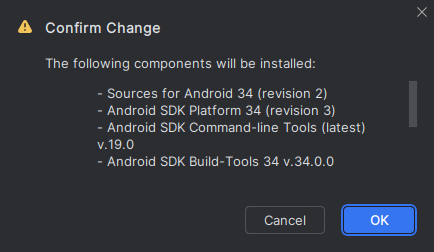
- Click OK to proceed with installing all selected libraries. Click OK again to confirm the libraries that will be installed.
- Wait for the installation process to complete (it will show the word Done and a Finish button will appear). Click the Finish button to complete the installation.
Install Gradle
-
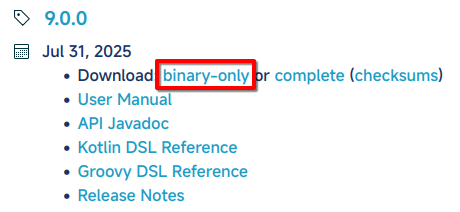
Go to the Gradle download website.
-
Click on the words binary-only for the latest version.
- Extract the downloaded
.zipfile to any folder.
Install FFmpeg
Windows and macOS
-
Go to the ffmpeg download website.
-
Download FFmpeg for your operating system. Then double-click the downloaded file to run and proceed with the installation.
Linux
FFmpeg is usually available in the software repository of your distro. Please install it according to the instructions specific to your distro.Check environment variables
Get the path information for the libraries
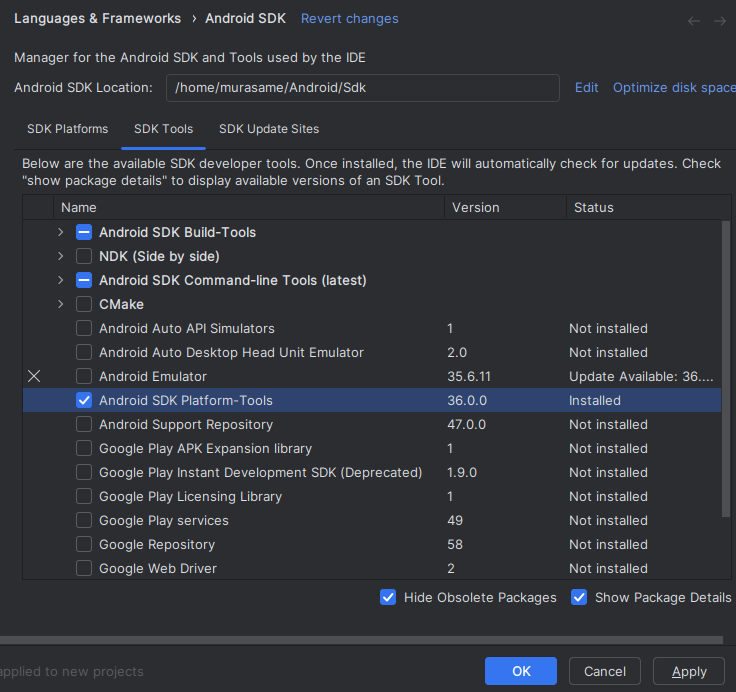
Android SDK
-
In the Android Studio application, select More Actions, then select SDK Manager.
-
The path for the Android SDK will be in the Android SDK Location box. For me, it will be
/home/murasame/Android/Sdk.

Java JDK
-
For Windows and macOS, the JDK path will be noted during the installation process, for example,
C:\Program Files\OpenJDK\17. -
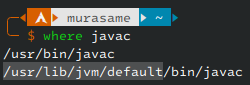
For Linux, use the command
where javac, then take the path that is not/usr/bin(for me, it's the second line) and remove the/bin/javacpart. For me, it will be/usr/lib/jvm/default.
Gradle
This is the path of the folder you extracted from the gradle-*.zip file.
Set environment variables
Windows
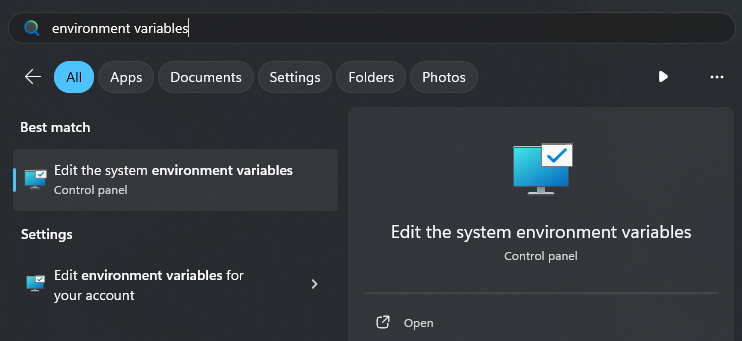
- Press the
Windows + Skey combination to open the search tool and search forenvironment variables. Click on the first item, Edit the system environment variables.
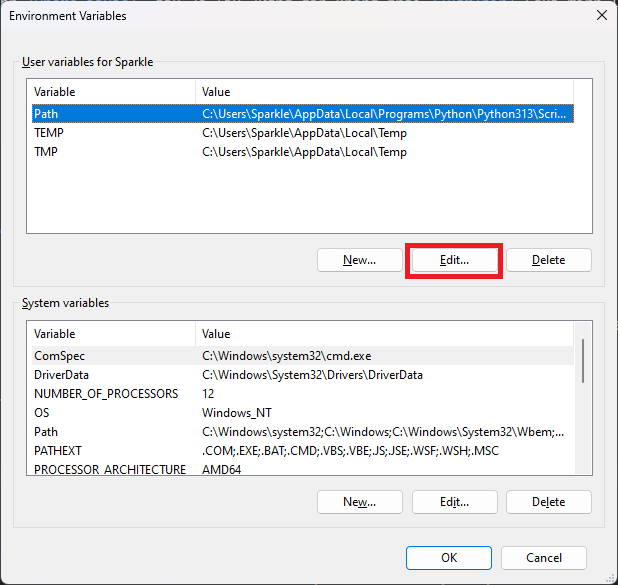
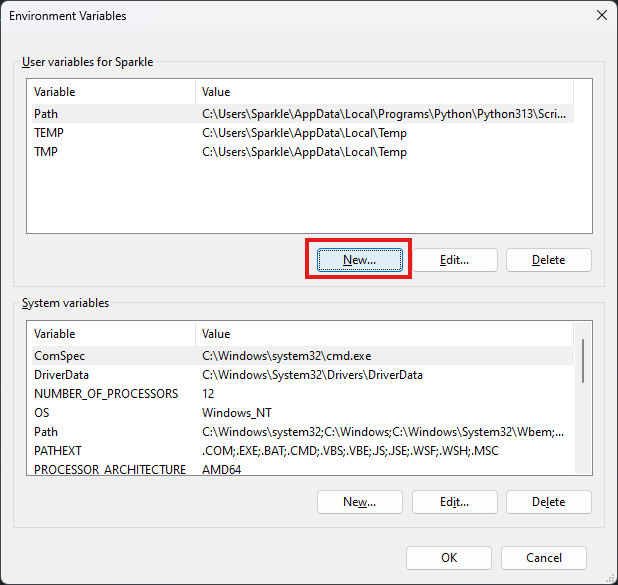
- Click the Environment Variables button.

- Select the Path item in the User variables section and click the Edit button.
-
Replace the following words in the paths below with the paths you have found:
-
sdkPath: The path of the Android SDK -
jdkPath: The path of the Java JDK -
gradlePath: The path of the extracted Gradle folder
-
-
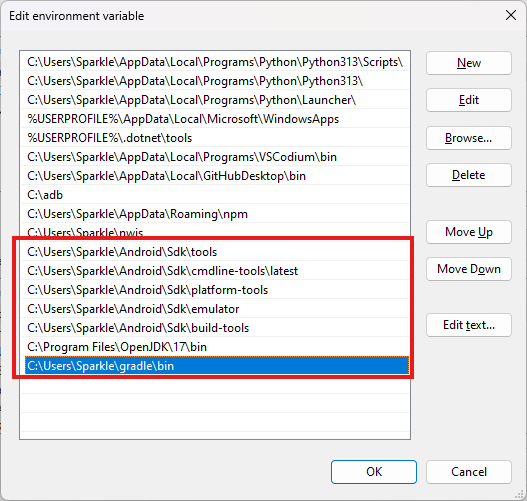
Click the New button and add the following paths one by one (each path is one New button click):
  sdkPath\tools
  sdkPath\cmdline-tools\latest\bin
  sdkPath\platform-tools
  sdkPath\emulator
  sdkPath\build-tools
  jdkPath\bin
  gradlePath\bin
For example, see the image below:
-
Click OK to save.
-
Click the New button to the left of the Edit button you just used.
- Enter the Variable name as
JAVA_HOMEand the Variable value as the path of the Java JDK.
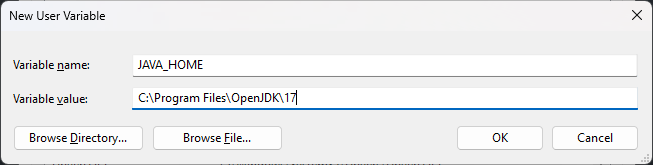
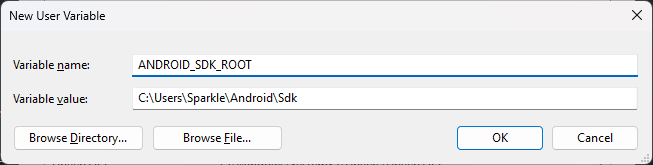
- Click OK to save. Continue by clicking the New button to create two more new variables,
ANDROID_HOMEandANDROID_SDK_ROOT, with the same value: the path of the Android SDK.

- Finally, click OK twice to save the settings.
macOS and Linux
-
Open the
/Users/$USER/.profilefile (or/home/$USER/.profilefor Linux) with any text editor. -
Add the following lines to the end of that file:
export ANDROID_HOME="/home/murasame/Android/Sdk" # Change to the Android SDK path you found
export ANDROID_SDK_ROOT="$ANDROID_HOME"
export JAVA_HOME="/usr/lib/jvm/default" # Change to the Java JDK path you found
export GRADLE_PATH="/home/murasame/gradle" # Change to the Gradle path you found
export PATH="$ANDROID_HOME/tools:$ANDROID_HOME/cmdline-tools/latest/bin:$ANDROID_HOME/platform-tools:$ANDROID_HOME/emulator:$ANDROID_HOME/build-tools:$JAVA_HOME/bin:$GRADLE_PATH/bin:$PATH"
- Log off from your computer's account and then log back in to apply the changes.
Check libraries
Open a command-line window and check the libraries below:
Android SDK
echo $ANDROID_HOME
If it prints the path you obtained earlier, you have succeeded.
Java JDK
java --version
If it prints openjdk 17, you have succeeded.
Gradle
gradle --version
If it prints the message Welcome to Gradle, you have succeeded.
If a library still reports an error, try the steps above again.
Install KeyStore Explorer
This application will be used to create keys and sign your Android application.
-
Go to the KeyStore Explorer download website.
-
Select the file to download based on the operating system you are using, and also read the notes in the Details section carefully.
-
Double-click the downloaded file to install KeyStore Explorer.
For Linux distros that do not support
.deband.rpmfiles (Arch Linux, Gentoo, etc.), please refer to the installation guide specific to your distro.
Create a new keystore to sign the APK file
If you have created a keystore before, you can reuse it instead of creating a new one.
To prevent Android from warning that the application is unsafe, we need to sign our APK file with a keystore file.
-
Open the KeyStore Explorer application.
-
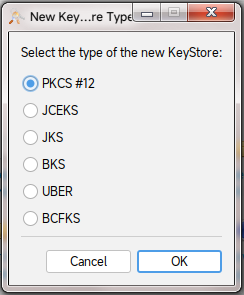
Click File -> New or the combination
Ctrl + Nto create a new keystore. Select PKCS #12 and click OK.
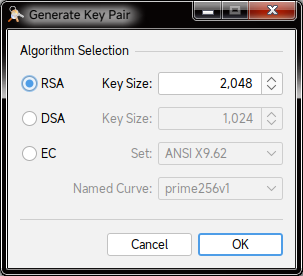
- Click Tools -> Generate Key Pair or the combination
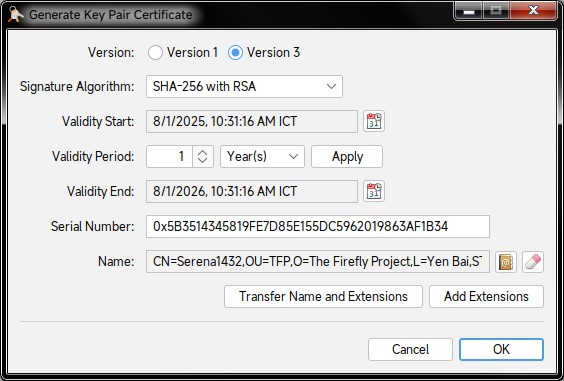
Ctrl + G. A Generate Key Pair dialog box will appear; leave it as default and click OK.
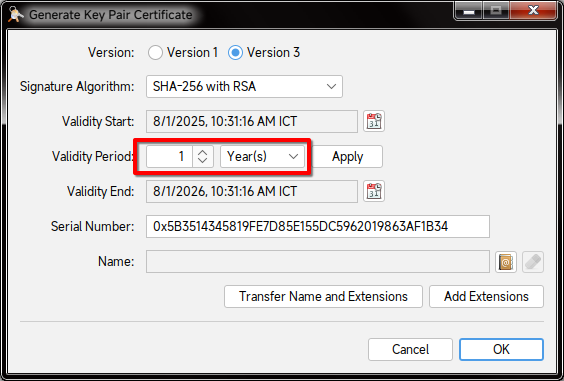
- Adjust the Validity Period to the amount of time you want your certificate to last. When the certificate expires, you must create a new key by following these steps again. Then click the Apply button.
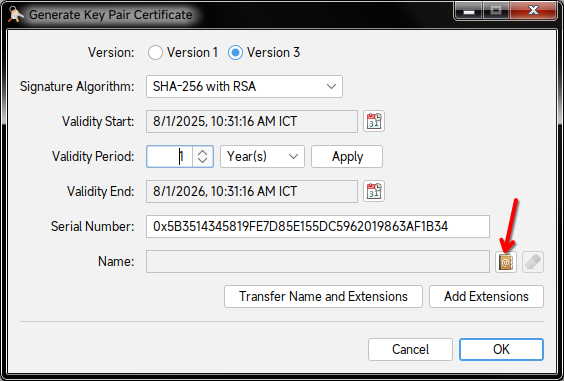
- Click the address book icon to the right of the Name section.
- A name entry form will appear; please fill it out according to the template below:
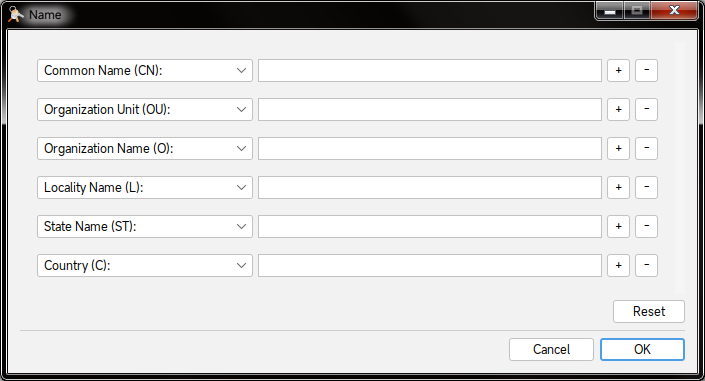
| Information | Description |
|---|---|
| Common Name (CN) | Your common individual or organization name; can be your real name or a nickname of your choice |
| Organization Unit (OU) | Sub-organization name, or can be another name of your choice |
| Organization Name (O) | Your organization’s name |
| Locality Name (L) | The city/province of the organization |
| State Name (ST) | The state/province you live in |
| Country (C) | Your country, written in 2-character ISO code (for example, Vietnam would be VN) |
If you do not have an organization, you can enter your personal information (or any information) in place of the organization name.
- Click OK to confirm. Review the information and click OK again to create the certificate.
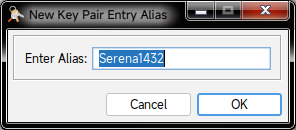
- Enter an alias for the newly created key. You can leave it as default and click OK.
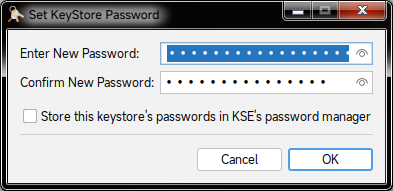
- Enter the password you want for your keystore, then click OK.
- Right-click on the Key Pair name on the KeyStore Explorer screen and select Set Password. Enter a new password for the Key Pair and click OK.
The keystore password and the Key Pair password can be different.
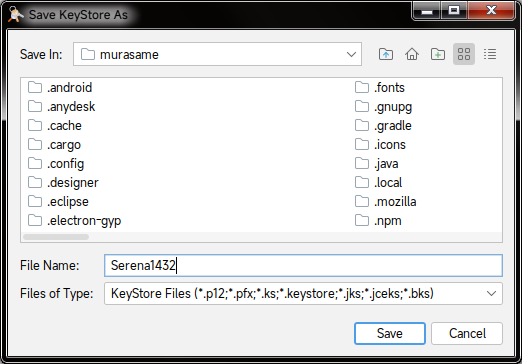
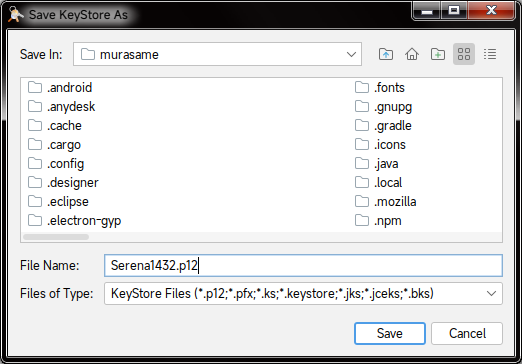
- Finally, click File -> Save or the combination
Ctrl + Sto save the key as a file with the.p12format.
After you have finished creating it, remember:
- The path of the newly created key file
- The Alias of the key
- The password for the Key Pair and the password for the keystore (the two passwords can be different)
You will need to use this information later.
RPG Maker MV/MZ
Test the game on the web
Since the .apk version on Android will use Android WebView (a browser embedded in the application), you should test it in a browser to check for errors before proceeding to package it for the phone.
You can see the Run RPG Maker MV games in a browser section in the Troubleshooting and Tips part of this guide for your operating system.
If an error occurs when playing on the web, you need to fix it yourself until it runs.
Preparation
You will only need to do these steps the first time.
Install Node.js
Windows and macOS
-
Go to the Node.js download page.
-
In the Or get a prebuilt Node.js® for section, select the operating system and OS type (x86, x64, or ARM64) that your machine is using. For example, the one below is for Windows 64-bit (x64):

- Double-click to run the newly downloaded file (Windows will be
.exe, while macOS will be.pkg). Then proceed to follow the instructions to install Node.js.
Linux
- First, install
nvm(Node Version Manager) for Linux:
curl -o- https://raw.githubusercontent.com/nvm-sh/nvm/v0.40.3/install.sh | bash
If nvm has a newer version later on, please change
0.40.3to that version, or you can read the guide on the official nvm GitHub page.
- After a successful installation, continue to install Node.js:
nvm install node
Install Git
Windows
-
Go to the Git download page for Windows.
-
Select the version for your operating system architecture (x64 or ARM64) in the Standalone Installer section. For example, if you are using Windows 64-bit, choose Git for Windows/x64 Setup.
-
After downloading, double-click to run the newly downloaded
.exefile and follow the instructions to complete the installation.
macOS
If you have installed Xcode, it already includes Git by default. If you don't have it yet, you can install Git through MacPorts:
sudo port install git
Linux
Git can be installed on all distros. Please install the git package according to the command for your Package Manager. For example, for Pacman on Arch Linux, it would be pacman -S git.
Install Cordova
- Run the following command line to install Cordova:
npm install -g cordova
- After the installation is complete, check the Cordova version:
cordova --version
It will output the Cordova version information (e.g., 12.0.0 (cordova-lib@12.0.2)).
Create a new Cordova project
- Open a command-line window and use the
cdcommand to move to the folder where you want to create the project, for example:
cd /home/$USER/Documents/Output/android
- Use the following command to create a new project:
cordova create "folder" "identifier" "name"
| Replace | With |
|---|---|
folder | The project’s folder, e.g., IDRemake
|
identifier | The project’s Android package identifier, usually in the format xxxx.xxxx.xxxx. E.g., vn.serena1432.idremake
|
name | The project name, which is also the application’s name; e.g., Nobihaza ID Remake
|

-
cdto the project folder you just created:
cd "IDRemake" # Replace IDRemake with the project folder you just created
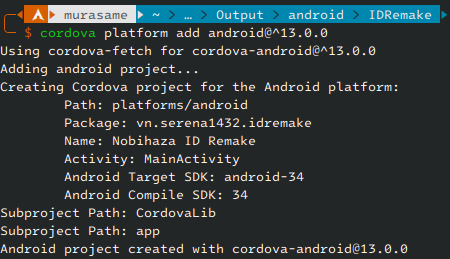
- Add Android to the project’s list of platforms:
cordova platform add android@^13.0.0
If you chose an older Cordova version (to support older Android versions) when installing the libraries, replace it with the command
cordova platform add android@^11.0.0(or replace 11.0.0 with the version you chose).
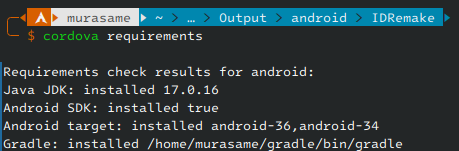
- Use the
cordova requirementscommand to check the libraries again:
cordova requirements
If there are no more yellow text lines as shown in the image below, you can continue. If not, you need to check the libraries in the Initial Preparation section again.
Add a virtual keyboard to the game
By default, the .apk version will not support a virtual keyboard, so you need to proactively add a virtual keyboard to the game project before packaging.
You can use any available plugin on the internet. However, in this guide, I will use my
Kiyoko_JoystickHandlerplugin to install the virtual keyboard.This is also the plugin I used to create the virtual keyboard for Doraemon: Nobita’s Resident Evil 2 (Vietnamese Version).
A full guide for this plugin will be available in the future. However, I have still included a short explanation for each setting in the plugin’s settings section.
-
Download the Kiyoko_JoystickHandler plugin file.
-
Add the images containing the keys you want to add into the
img/JoyStickfolder in.pngformat. If you want to use the default keys I created instead, you can download this file and extract it into theimg/JoyStickfolder. -
Add the newly downloaded plugin to the project’s
js/pluginsfolder, and open the project’s Plugin Manager in RPG Maker MV/MZ. Add the Kiyoko_JoystickHandler plugin to the plugin list. -
On the right side of the plugin (Parameters) will be the list of settings. Double-click on each setting to view information and edit it.

- The settings for each section have been opened; please double-click to edit them as you wish.
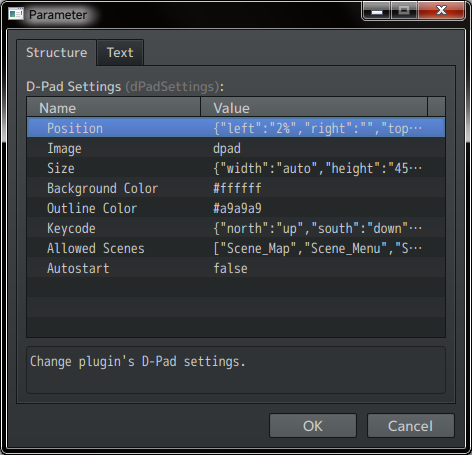
- While editing information, the plugin will also briefly explain this setting in the small dialog box below.

- Start editing all settings until you are satisfied. Then click OK repeatedly until the Plugin Manager window is closed, and save the project.
You should turn off the Phone Only option to be able to test the virtual keyboard on the computer. After you have finished testing, turn this option back on to hide the virtual keyboard when players are playing the game on a computer.
Add game data to the project
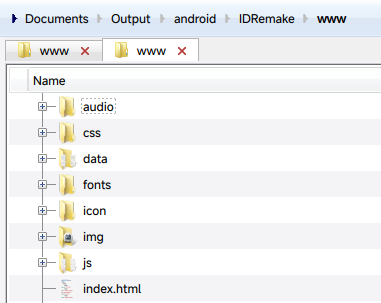
- Access the game folder and copy all the files in the game’s
wwwfolder.
Some games will not have a
wwwfolder. In this case, copy theaudio,data,fonts,icon,img,js,moviesfolders and theindex.htmlfile from the game folder.
- Paste the copied files into the project’s
wwwfolder.
Convert audio from .ogg to .m4a
For mobile phones, the game will use .m4a audio files instead of .ogg like on a computer, so you need to convert all audio files:
This command line will first convert all
.oggfiles to.m4a, and then delete the original.oggfiles to save space.
Windows
Open PowerShell, use the cd command to navigate to the project's www folder and use the following command:
Get-ChildItem -Recurse -Filter *.ogg | ForEach-Object { ffmpeg -i $_.FullName -c:a aac -b:a 96k -ar 44100 -map_metadata 0 ($_.FullName -replace '\.ogg$', '.m4a'); if ($?) { Remove-Item $_.FullName } }
macOS and Linux
Open Terminal, use the cd command to navigate to the project's www folder and use the following command:
find . -type f -name "*.ogg" -exec sh -c 'ffmpeg -i "$0" -c:a aac -b:a 96k -ar 44100 -map_metadata 0 "${0%.ogg}.m4a" && rm "$0"' {} \;
Wait until the conversion process is complete (no more lines are printed).
Edit the config.xml file
Initial edits
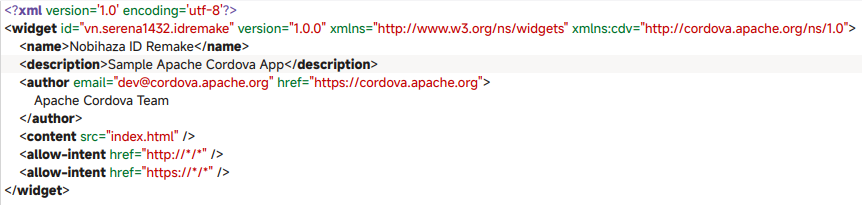
- Open the
config.xmlfile in the project folder with any text editor.
-
Replace
Sample Apache Cordova Appin thedescriptionsection with the game description you want. -
Replace the email
dev@cordova.apache.organd websitehttps://cordova.apache.orgin theauthorsection with your email and website. ReplaceApache Cordova Teamwith your name.
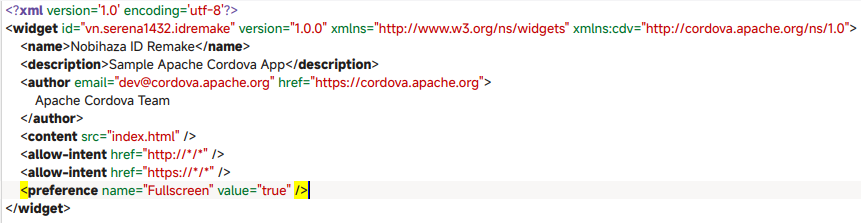
Hide the notification bar and navigation buttons when playing
Add a new line before </widget> and paste the following line into that line:
<preference name="Fullscreen" value="true" />
Change the APK file’s icon
Add a new line before </widget> and paste the following line into that line:
<icon src="www/icon/icon.png" />

At this point, the APK file’s icon will be the same as the game’s icon in RPG Maker MV. If you want to change the game’s icon, change the www/icon/icon.png file to another file (but keep the name the same).
Change the game’s version
Change 1.0.0 (or the current version in the <widget ... version=""> section of config.xml) to the game version you want, for example, from 1.0.0 to 1.0.1:


Then save the file.
Force landscape screen orientation
If not done, the game will default to starting in portrait mode.
Add a new line before </widget> and paste the following line into that line:
<preference name="orientation" value="landscape" />

Then save the file.
Set up APK file signing
To prevent Android from warning that the application is unsafe, we need to sign our APK file with a keystore file.
- Open any text editor you want, and copy the following text block:
{
    "android": {
        "debug": {
            "keystore": "android_debug.p12",
            "storePassword": "storepassword",
            "alias": "android",
            "password" : "keypairpassword",
            "keystoreType": "pkcs12",
            "packageType": "apk"
        },
        "release": {
            "keystore": "android_release.p12",
            "storePassword": "storepassword",
            "alias": "android",
            "password" : "keypairpassword",
            "keystoreType": "pkcs12",
            "packageType": "apk"
        }
    }
}
- Change the information in the
debugandreleasesections to the information of 2 keystores (or you can use 1 keystore for both sections):
| Information | Description |
|---|---|
keystore | The path of the keystore file (in .p12 format) |
storePassword | The password of the keystore you set during creation |
alias | The alias of the Key Pair in the keystore |
password | The password of the Key Pair in the keystore |
keystoreType | Write pkcs12. Can be left blank and the system will auto-detect based on the file extension |
packageType | Write apk to create an .apk file |
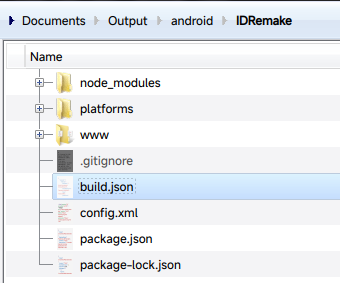
- Save the edited text block as a
build.jsonfile and place it in the project’s folder.
Package the application
Now comes the most important part: packaging the application!
-
Open a command-line window and
cdto the project folder if you haven’t already. -
Start packaging the application:
cordova build --release android
Replace --release with --debug if you want your .apk file to support debugging tools.
- Please wait until you see the BUILD SUCCEEDED message as shown in the image below. If there is an error, try checking the error and proceed to build again.
The first time packaging may take a very long time, but that is normal. Subsequent packaging will be faster.

The .apk file will be in one of the following two paths:
-
projectfolder/platforms/android/app/build/outputs/apk/debug/app-debug.apkif built asdebug. -
projectfolder/platforms/android/app/build/outputs/apk/release/app-release.apkif built asrelease.
Update the application
Please ensure you are using one keystore for all updates. If the keystore is different, players will not be able to update your application!
Please follow these steps sequentially when updating to a new version of the game: